Committing
Previous | Next | Guide to using Git with GEOS-Chem | Getting Started with GEOS-Chem
- Introduction to Git
- Installing Git
- First-time Git setup
- Cloning (i.e. downloading for the first time)
- Ignoring files
- Viewing the revision history
- Using Git GUI
- Branching
- Committing
- Tagging
- Merging
- Receiving updates (aka pulling)
- Using patches to share your updates with others
- Advanced Git usage
- Git and Github tutorials
Contents
Overview
On this page, we provide instructions on how to commit source code changes with Git.
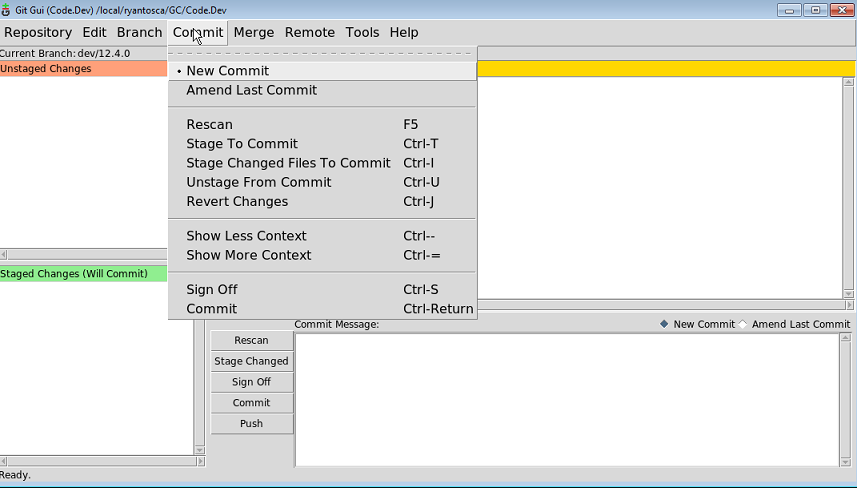
Creating a commit with Git GUI
With Git, you should commit frequently, such as when you have completed making revisions to a file or group of files. Commits that are made on one branch will not affect the other branches.
Committing is best done with the Git GUI.
(1) Start Git GUI.
git gui &
(2) Select Commit/Rescan from the menu (or type the F5 key) to force Git GUI to show the latest changes.
(3) You should see a list of files in the Unstaged Changes window. These are files that have been modified.
(4) Stage your changes (i.e. tell Git to add the modifications to the revision history). This can be done in one of two ways:
- Click on the icons at the left of each file name in the Unstaged Changes window, OR
- Click on the Stage Changed button. (WARNING: This will stage ALL changes!)
(5) If you need to remove a file from Staged Changes, just click on its icon. It will be moved back to Unstaged Changes. Git will not include that file in the revision history.
(6) Type a commit message in the bottom right window. See this example of a good commit message. Some pointers are:
- The first line should only be 50 characters or less and succinctly describe the commit
- Then leave a blank line
- Then add more in-depth text that describes the commit
(7) Click on the Sign off button. This will add your name, email address, and a timestamp.
- To modify your name and email address, edit the .gitconfig file in your home directory, as described in First-time Git setup.
(8) Select one of the two radio buttons above the Commit message window.
- New commit: This is the default. Assumes you are making a totally new commit.
- Amend last commit: If for whatever reason you need to update the last commit message, pick this button.
(9) Click on the Commit button.
(10) View the revision history again. You should see your new commit.
Renaming or moving files
In some instances you may find it necessary to rename files or move files to a new folder. For example, in GEOS-Chem v9-01-02, we have had to rename file ending in .f to .F and .f90 to .F90. If only the name of the file changes, then Git will recognize it as a renamed file in the repository.
Renaming files
To rename a file, follow these steps:
(1) Change the name of the file with the Unix mv command.
- e.g.: mv myfile.f myfile.F.
(2) Open the git gui. You will see the two files myfile.f and myfile.F listed in the Unstaged Changes window.
(3) Click on myfile.f and myfile.F; this will move them to the Staged Changes window.
(4) In Staged Changes you will see:
- File myfile.f is slated to be removed (i.e. a red "X" is listed next to the file name).
- File myfile.F is slated to be added (i.e. a green checkmark is listed next to the file name).
(5) Add a commit message, sign off, and click Commit |as described above.
(6) Start the gitk browser. In the lower left window, you should see text such as:
  ---------------- GeosCore/myfile.F --------------------------
  similarity index 100%
  rename from GeosCore/myfile.f
  rename to GeosCore/myfile.F
From this point forward, file myfile.F will use the *.F file extension. However, it will still possess the total revision history from when the file was still named myfile.f. If you merge changes from another repository that still has myfile.f, then these changes will be seamlessly integrated into myfile.F.
Moving files
If you need to move a file to a new folder, then follow these steps:
(1) Move the file to a new folder.
- e.g. mv GeosCore/myfile.F NewFolder/myfile.F.
(2) Open the git gui. You will see the two files myfile.f and myfile.F listed in the Unstaged Changes window.
(3)Click on myfile.F and NewFolder/myfile.F; this will move them to the Staged Changes window.
(4) In Staged Changes you will see:
- File myfile.F is slated to be removed (i.e. a red "X" is listed next to the file name).
- File NewFolder/myfile.F is slated to be added (i.e. a green checkmark is listed next to the file name).
(5) Add a commit message, sign off, and click Commit as described above.
(6) Start the gitk browser. In the lower left window, you should see text such as:
  ---------------- NewFolder/myfile.F --------------------------
  similarity index 100%
  rename from GeosCore/myfile.F
  rename to NewFolder/myfile.F
From this point forward, file NewFolder/myfile.F will still possess the total revision history from when the file was still named GeosCore/myfile.F. If you merge changes from another repository that still has GeosCore/myfile.F, then these changes will be seamlessly integrated into NewFolder/myfile.F.
--Bob Yantosca (talk) 15:56, 20 June 2019 (UTC)
Further reading
Previous | Next | Guide to using Git with GEOS-Chem | Getting Started with GEOS-Chem
